Exploring Hosting Account Resource Limits. Take a deeper look at the way we manage hosting account resource limits to ensure our servers are running as fast, and as fairly as possible. Our main objective when it comes to limiting resources , is keeping your website and email services operational. Limits existing in shared hosting environments to prevent services failing due to resources becoming exhausted.
Shared hosting is when multiple users (or customers) have services held on the same server.
Each user has their own hosting account, and the file system of this hosting account is often referred to as a user’s home directory. The home directory is the file system that the user (or customer) is allowed to make changes to.
Part(s) of the home directory is tied in to the web server. These are called document roots, and they’re where websites are served from.
We use CageFS to containerise home directories, which prevents one account being able to do things to another account’s file system.
As home directories and therefore hosting accounts share a common underlying file system, we have to ensure that one account can’t negatively affect another account, or the services being operated by another customer.
All services that run server side (such as the web server, database server, and mail server) are also global, and therefore shared, by all users.
It’s due to this sharing of services that limits exist, as we have to allow all customers to use these services in a fair and even way, and prevent one customer’s services monopolising services, which would result in services becoming unavailable to other customers.
Disk space
Disk space refers to the amount of storage or disk space that your hosting account can use. Disk space is measured in bytes (B), megabytes (MB), gigabytes (GB), and terabytes (TB). There are 1024 bytes in a megabyte, 1024 megabytes in a gigabyte, and 1024 gigabytes in a terabyte.
The Unlimited Hosting, Multisite Hosting and Business Hosting packages that we provide don’t have an explicit disk space limit. We operate like this so that you don’t suddenly find that you can’t receive emails, or that your website has failed.
We do have to have some kind of fair usage policy for shared hosting simply to stop one account using up all of the server’s disk space. Whilst this may sound like an extreme event it can happen by accident (poorly configured backups exponentially consuming disk space for example).
The fair usage policy exists to prevent one customer causing all other customers website and email address to fail.
Other hosting packages that we provide do have disk space limits such as Starter Hosting which has a 250MB limit, this package is provided at a low cost to allow smaller websites to be operated with a reduced financial overhead. The Essentials Hosting package provides a 1GB limit as this is roughly the smallest amount of disk space you’d need to run a reasonable CMS based site, such as WordPress. Again, the cost is minimised so that you’re not paying an excessive amount just to be able to use a CMS.
Why we bill some packages according to disk space
The more disk space hosting accounts use, the more disk space the server needs to have. While you can put more disk in a server, we have to buy them.
The expectation with web hosting is for the disks to be SSD based, rather than traditional platter based drives. The storage and retrieval of data is faster when SSD based drives are use. SSD based drives are more expensive, so costs increase (more than they once did) as more disk space is used.
How to check your account’s disk usage
If you log in to your cPanel, down the right hand side are some usage statistics. One of these is “disk usage” which displays how much disk space is currently being used. The current disk usage and limit is displayed in the format of:
current usage / limit
For example, if you’re using Essentials Hosting, your account has a 1GB limit, and if you use 106MB (around 10%) you’ll see this detailing your account’s disk usage:

Alternatively if you’re using an account with no disks space limit, you’ll see an infinity sign as the limit:

Configuring Disk Space Alerts
In the “Contact information” section of your cPanel, you can configure disk usage notifications:

Then in the “email address” field at the top enter your email address, and tick the “My account approaches its disk quota.” option then save changes:
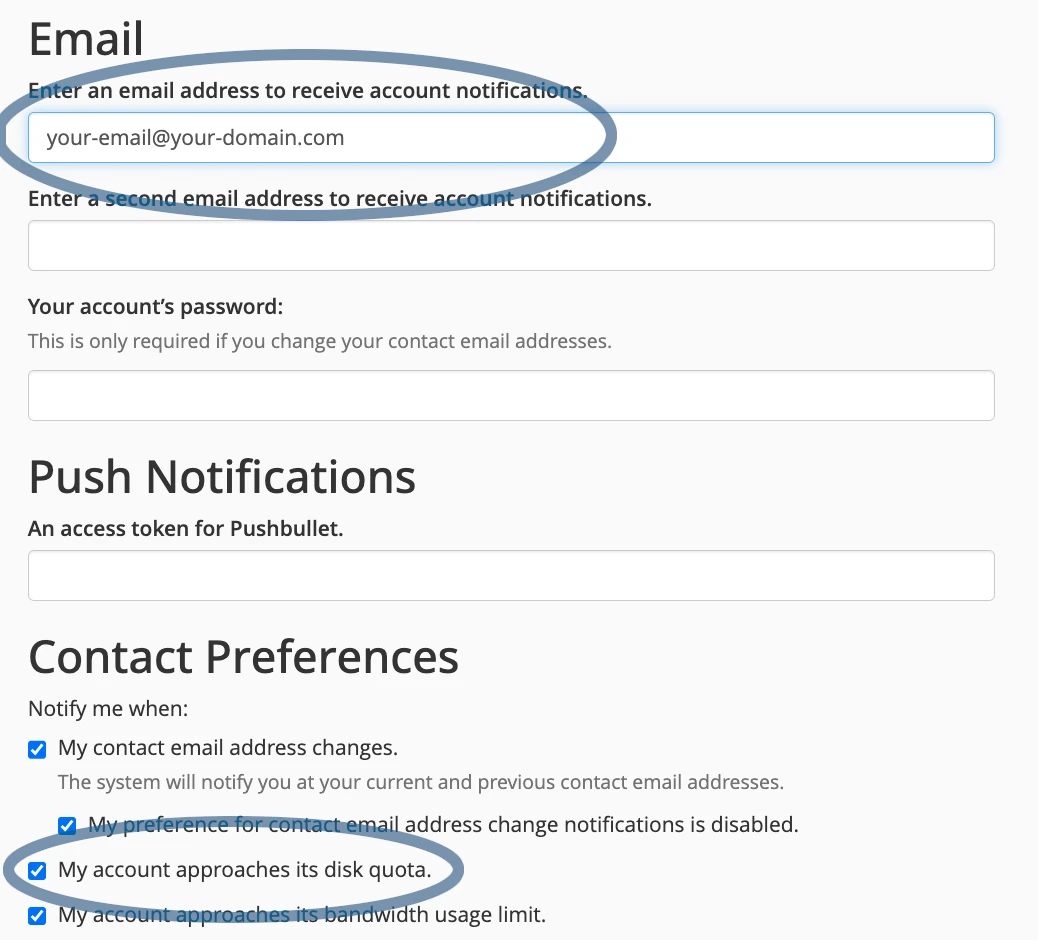
With the above in place, you’ll be sent email notifications when your account approaches it’s disk space limit. It’s advisable to specify an email address that’s external to your cPanel hosting, as you can’t receive emails if you’ve run out of disk space.
How to Obtain More Disk Space
You can obtain more disk space by upgrading. Upgrading can be carried out via your Netnerd account by clicking on:
Services > My services > Active (on the same line as the account you’d like to upgrade) > Upgrade/downgrade > Select the package you’d like to upgrade to > Complete the checkout/payment process
The upgrade is automatically applied shortly after payment is received.
Upgrade costs are calculated on a pro rata basis, taking where you are in your billing cycle and what you’ve already paid in to account, so that you’re only paying to upgrade the remainder of your billing cycle.
The disk space limits of the shared hosting accounts we provide are as follows:
| Hosting Package | Disk Space Limit |
| Starter Hosting | 250 MB (1/4 GB) |
| Essentials Hosting | 1GB |
| Essentials Cloud Hosting | 1GB |
| Standard Cloud Hosting | 10GB |
| Multisite Cloud Hosting | 20GB |
| Business Cloud Hosting | 30GB |
| Pro Hosting | 100GB |
| Unlimited Hosting | Unlimited |
| Multisite Hosting | Unlimited |
| Business Hosting | Unlimited |
Inodes
Inodes are files and directories (or folders). One file is one inode, and one directory (or folder) is one inode.
File systems can only support a finite number of inodes. As most computers (including our servers) use file systems, we have to ensure that one customer can’t use up enough inodes to cause problems for other customers operating on the same server.
Why we Bill According to Inode Usage
If you log in to your cPanel, down the right hand side are some usage statistic.
A file system can only support a finite number of inodes. For example’s sake, let’s say this is 100.
A server costs money to run, in terms of the cost of hardware, the human resource associated with maintaining and administering a server, rack space, and electricity. For example’s sake, let’s say the total combined cost of running a server is £100.
If we allow each customer to use 10 inodes each, this means that we can host 10 customers on one server:
100 / 10 = 10
So the operational cost per customer is £10:
£100 / 10 = £10
If we allow each customer to use 25 inodes, this means we can host 4 customers on each server:
100 / 25 = 4
And the operational cost per customer then becomes £25:
£100 / 4 = £25
The more inodes we allow customers to use, the fewer customers can be hosted per server. To cover the operational cost, we have to increase the per customer cost to cover the operational overhead of the server (and remain financially viable as company).
Although in reality the math is more complex, there is a direct relationship between inodes and operational costs.
How to Check Inode Usage
If you log in to your cPanel, down the right hand side are some usage statistics. The inode usage is displayed as “file usage” displaying in the format of:
number of inodes in use / inode limit of account
Like this:

There isn’t a particularly friendly way to see where inode count is being used.
You can submit a support ticket to ask us to check inode usage for you, or request that SSH access be enabled on your account, and then use this command to count inodes per directory:
find . -printf "%h\n" | cut -d/ -f-2 | sort | uniq -c | sort -rn You can then navigate around directories using this to descend in to directories:
cd directory_nameAnd this to ascend out of directories:
cd ..We don’t expect our customers to be able to do this, so feel free to ask us to carry this out for you.
Configuring Inode Alerts
The disk space notifications also apply to inodes, so if you enable disk space alerts, you’ll also be alerted when your account approaches it’s file count limit. To do this, in your cPanel click on “contact information”:

Then in the “email address” field at the top enter your email address, and tick the “My account approaches its disk quota.” option then save changes:

How to Obtain a Greater Inode Limit
You can obtain more inode count by upgrading. Upgrading can be carried out via your Netnerd account by clicking on:
Services > My services > Active (on the same line as the account you’d like to upgrade) > Upgrade/downgrade > Select the package you’d like to upgrade to > Complete the checkout/payment process
The upgrade is automatically applied shortly after payment is received.
Upgrade costs are calculated on a pro rata basis, taking where you are in your billing cycle and what you’ve already paid in to account, so that you’re only paying to upgrade the remainder of your billing cycle.
The inode limits of the shared hosting packages we provide are:
| Hosting Package | Inode Limit |
| Starter Hosting | 10,000 |
| Essentials Hosting | 35,000 |
| Essentials Cloud Hosting | 35,000 |
| Standard Cloud Hosting | 125,000 |
| Multisite Cloud Hosting | 250,000 |
| Business Cloud Hosting | 300,000 |
| Pro Hosting | 750,000 |
| Unlimited Hosting | 125,000 |
| Multisite Hosting | 250,000 |
| Business Hosting | 300,000 |
Bandwidth
Bandwidth is the amount of data transfer specific to a hosting account. This includes website, email and FTP traffic.
If you upload a 2MB image file using FTP, that’s 2MB of bandwidth.
If you collect an email that’s 1.2MB in size, that’s 1.2MB of bandwidth.
When it comes to website visits it’s a bit harder to work out bandwidth.
If you have a website that’s one page, and this page is a 1MB image, and 512B of HTML, the total page size is 1.2MB. Each time this page is visited 1.2MB of bandwidth is used. Obviously this is an oversimplification, as pages vary in size and the number of pages, and the number of visits each page receives can also vary.
We Don’t Have Any Bandwidth Limits
We don’t have any bandwidth limits in place.
Not only is bandwidth hard to plan for when it comes to page sizes an the number of visits, but in some cases you don’t have any control over who might visit your website. Or more specifically WHAT might visit your website.
I’m talking about robots, crawlers, and spiders. Whatever you want to call these things, there’s an awful lot of automated website reading (or indexing) that takes place in an automatic manner.
Some of this bot traffic is legitimate, such as the Googlebot, or the Bingbot reading your website’s pages to decide how your pages to decide how your website should rank in search engine results. Some of this traffic is, sadly, hackers looking for vulnerable websites to exploit.
There’s also a considerable amount of “in between” or “grey” bot traffic, such as data aggregators, marketing bots, AI bots, security checking bots, podcast bots, and much much more.
We think that somewhere between 75% and 80% of all traffic reaching our platform is automated.
Obviously you don’t control or influence this, and while bots can be blocked, this would be the equivalent of a near infinite game of whack-a-mole. This is why we don’t limit bandwidth.
CPU and RAM
These are a bit harder to understand when compared to the above.
You might have experienced a problem when you’ve opened a program on your computer, and suddenly it slows down and you can hear a fan inside going nuts. That’s your computer using a lot of CPU power. This causes the the CPU to get hot because it’s doing more work (that’s what the fan going nuts is all about), and processor tasks start to queue, which is what causes the slow down.
A similar thing can, and sometimes does happen to a shared hosting server when there’s lots of CPU task. Yes, that’s right, everyone’s websites slow down. Obviously this is an undesirable situation, so we limit the amount of RAM each hosting account can use, in an effort to reduce high CPU load and slow down. We also limit CPU to stop one person with a resource intensive website causing everyone else’s sites to slow down.
What is CPU?
CPU stands for central processing unit. It’s the part of any computer that does calculations, maths, and code processing.
In the context of websites, not much CPU is used by flat HTML sites, as there’s not a great deal of calculating that takes place. More CPU is used by PHP based content management system (CMS) type websites. I’m referring to sites made using CMS’ such as WordPress, Joomla, Drupal and so on.
Websites made using PHP based CMS involve the execution of code. The execution of code involves CPU work. The more code, the more CPU work.
The more plugins you install in a WordPress installation, the more code is executed, and more CPU resources are used accordingly. Due to the variation in the number of plugins that can be used, CPU usage varies between individual WordPress sites. The amount of concurrent visits also affects how much CPU is used.
As a server has a finite amount of CPU resources, it can host a larger amount of low CPU usage sites, or a lower amount of high CPU usage sites.
What Happens When CPU Resources are Exhausted?
When server side CPU resources become exhausted, this is an effect of CPU tasks accumulating quicker than they complete. This causes a queue of CPU jobs to build up. As jobs queue before they’re processed, the overall time for a CPU job to complete increases.
Then everything on the server slows down. It takes longer for sites to be served, longer for code to execute, longer for pretty much everything to happen.
We have to effectively share our CPU resources between accounts to minimise the chance of CPU resources being exhausted.
What is RAM
RAM stands for random access memory.
RAM is a type of computer memory that is used to store data temporarily while a computer is running. RAM holds data and programs currently being used by the processor.
If a program needs to work something out, then do something else to what’s been worked out, the original part that’s worked out is stored in RAM. It’s a bit like when you’re doing long division and you have to carry the remainder. Writing the remainder down is a bit like the equivalent to storing something in RAM.
As you can probably tell, there’s a relationship between calculation (CPU), and temporary storage (RAM), so again RAM usage is higher for websites that use PHP based CMS, and the more complex these are the more RAM is used.
What Happens When RAM is Exhausted?
Bad things. Real bad things happen when RAM is exhausted.
When a system runs out of available RAM, it doesn’t have enough space to store the data and applications that are currently in use.
At the “nice” end of the spectrum this can lead to various performance issues and problems such as programs (such as your PHP based website) crashing. At the “nasty'” end of the spectrum, you can end up with data corruption which isn’t a good thing, and often results in the need to restore backups.
Because bad things happen when RAM runs out, the disk of the computer is used as RAM. This is called the page file. As disk IO isn’t as quick as RAM, when the page file is used, everything slows down.
Services are also terminated when RAM runs out, in an effort to free up RAM to prevent data corruption. It’s usually MySQL that’s terminated (because MySQL uses lots of RAM). When this happens all the websites held on the server that use a database fail.
As we don’t want websites to fail, or for one person to cause everyone else’s websites to fail, we have to effectively share out (and therefore limit) RAM per hosting account.
How to Monitor RAM and CPU Usage
We use Cloudlinux to limit RAM and CPU resources on a per account basis.
Cloudlinux adds a “resource usage” facility to cPanel accounts:

Clicking this resource usage icon, then clicking the “details” button presents you with a set of graphs that show CPU and RAM (as well as processed and disk IO) usage for your account over time. The “date range” facility can be used to check historical usage:
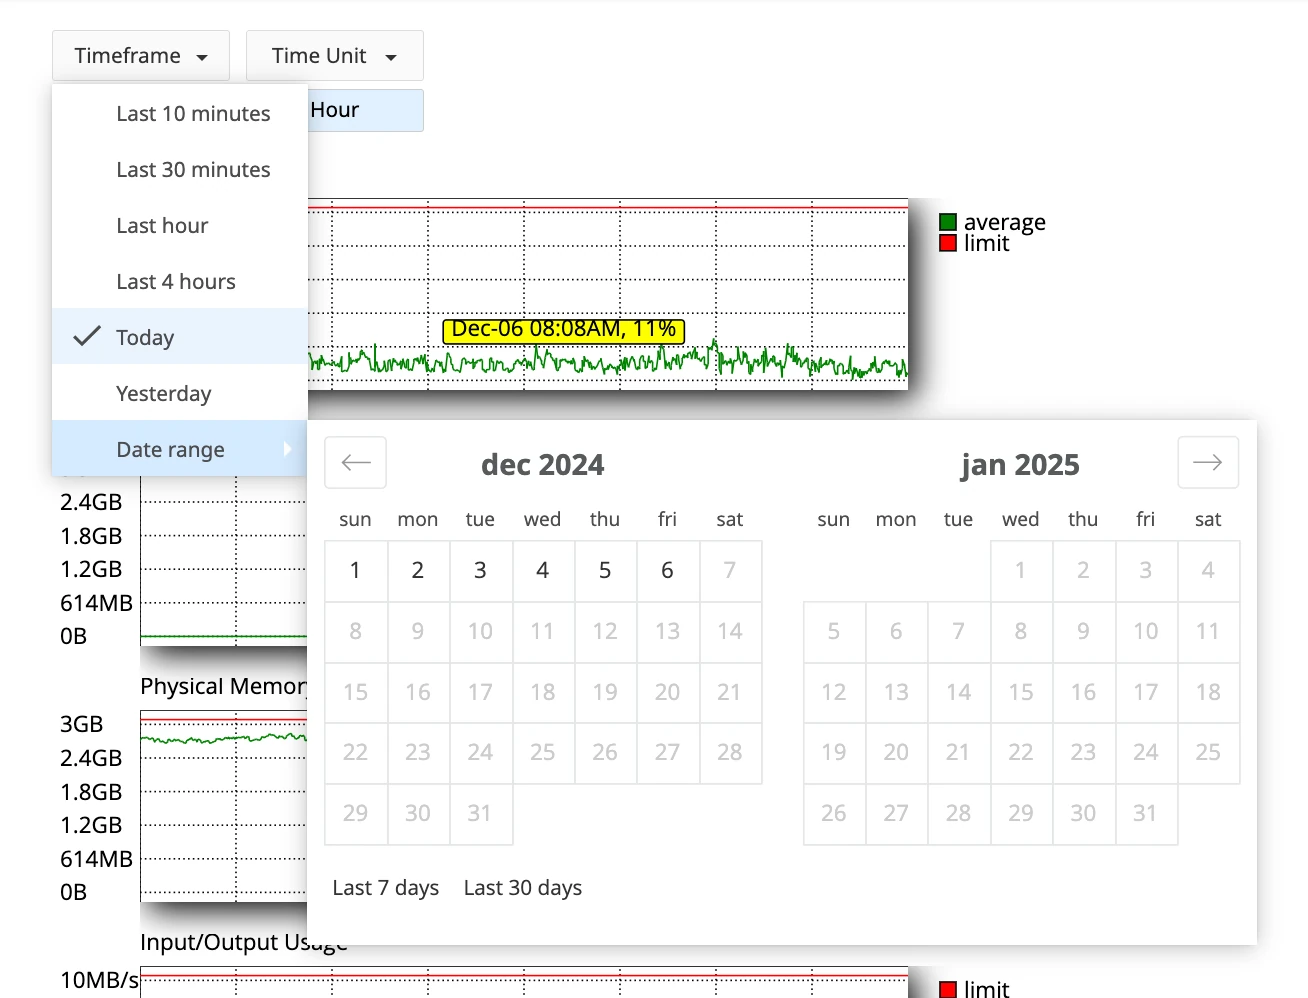
You’ll then be presented with a selection of graphs that show resource usage over time:
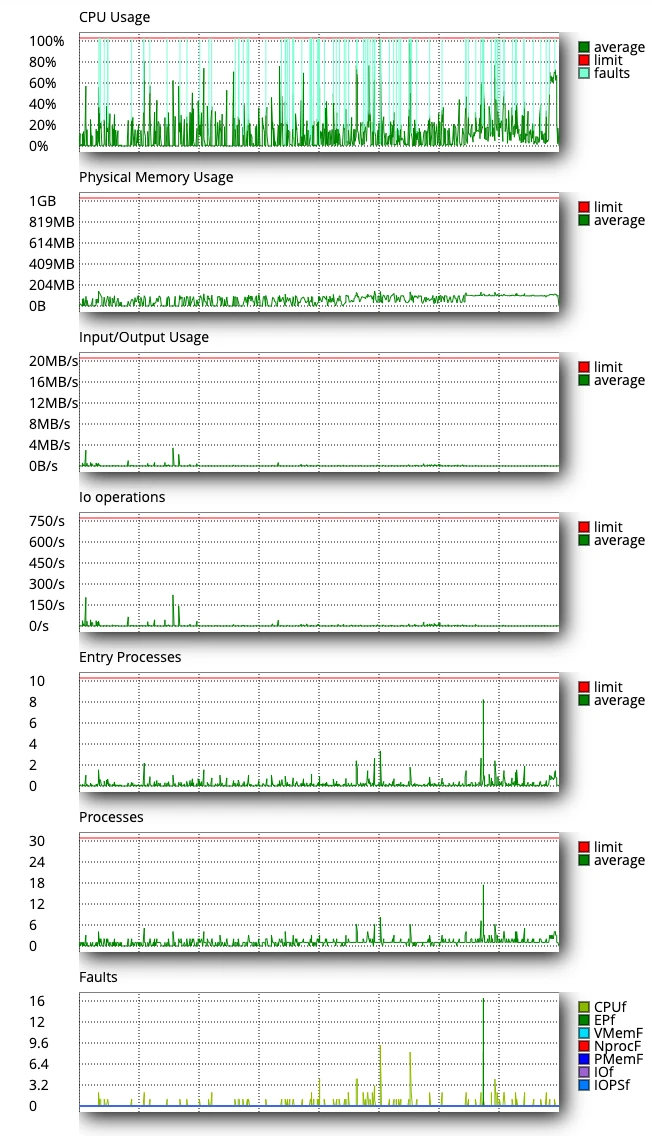
As you can see in the graphs above, CPU is regularly being exhausted. When this happens, this site (not everyone’s) will slow down.
To address this there are two options:
- Optimise the site to reduce the CPU overhead.
- Obtain more CPU resources to accomodate the site
How to Reduce RAM and CPU Usage
Unfortunately there’s no clear cut one size fits all answer to reducing RAM and CPU usage.
The actions you’ll need to take to reduce RAM and CPU usage are essentially dictated by what’s causing the RAM and CPU usage, which varies between websites. Some default advice that can help reduce RAM and CPU overhead are:
Caching
There’s less of an overhead related to the serving of cached data in comparison to freshly generated data being served. This is really why caching exists in the first place. There are various caching mechanisms that can be deployed in the context of websites:
- Define a caching policy to instruct browsers to cache static assets, such as scripts, media, and font files.
- Use a persistent object cache to cache commonly used parts of your website (redis and memcahed are available to all shared hosting packages).
- Use a caching plugin in your CMS such as Litespeed cache, w3 total cache or WP fastest cache if you’re using WordPress, or Speed Cache or Cache Extend if you’re using Joomla.
Reduce Your Site’s Code Overhead
Reducing the overhead or your site’s codebase will result in less RAM and CPU being used.
- Remove plugins or themes (WordPress), or templates and components (Joomla) that you’re not using, or can manage without.
- Use Opcache to to store your site’s bytecode in RAM.
- Index database tables that contain large amounts of data for faster data retrieval.
How to Obtain More RAM and CPU Resources
Optimising a website isn’t something that everyone can cover to the same degree. If you find that you need more resources to operate your site, you can do so by upgrading.
Upgrading can be carried out via your Netnerd account by clicking on:
Services > My services > Active (on the same line as the account you’d like to upgrade) > Upgrade/downgrade > Select the package you’d like to upgrade to > Complete the checkout/payment process
The upgrade is automatically applied shortly after payment is received.
Upgrade costs are calculated on a pro rata basis, taking where you are in your billing cycle and what you’ve already paid in to account, so that you’re only paying to upgrade the remainder of your billing cycle.
The RAM and CPU limits of the shared hosting accounts we provide are as follows:
| Hosting Package | CPU (% of CPU core availbility) | RAM (GB) |
| Starter Hosting | 50 | 0.5 |
| Essentials Hosting | 75 | 0.75 |
| Essentials Cloud Hosting | 75 | 0.75 |
| Standard Cloud Hosting | 100 | 1 |
| Multisite Cloud Hosting | 150 | 2 |
| Business Cloud Hosting | 200 | 3 |
| Pro Hosting | 400 | 4 |
| Unlimited Hosting | 100 | 1 |
| Multisite Hosting | 150 | 2 |
| Business Hosting | 200 | 3 |
The Difference A VPS Makes
VPS stands for Virtual Private server.
Netnerd.com offer a range of cloud based VPS, each with their own resource set.
If you use a VPS, you’ll get your own server, with it’s own dedicated resource set, such as RAM and CPU. This resource set is all allocated to the operation of your website and email services as these services are held on your own server (instead of being held on a server that also contains other people’s services).
Instead of having an account based disk space limit, the disk space of the whole VPS can be used by your website and mailboxes.
Instead of there being a per account inode limit, the supported inode limit of the VPS’ file system is in effect.
Instead of there being per account RAM and CPU limits, the RAM and CPU of the VPS as a whole is dedicated to the operation of your online services.
The VPS we offer are fully managed, so that you don’t need to administer the server as a whole (we do that for you), and you can continue to use your cPanel, just as you have done in the past, but with a lot more resources to use.
The Levels of VPS we offer and the RAM and CPU they provide is as follows:
| VPS | RAM | CPU Cores | Disk Space | Cost per month |
| Level 2 | 4 GB | 2 | 60 GB | £42.99 |
| Level 3 | 6 GB | 3 | 120 GB | £52.99 |
| Level 4 | 8 GB | 4 | 200 GB | £62.99 |
| Level 5 | 12 GB | 5 | 300 GB | £77.99 |
| Level 6 | 16 GB | 6 | 600 GB | £127.99 |
(Prices exclude VAT, all VPS come with a 5 account cPanel license, licenses can be uplifted to accomodate more cPanel accounts at an additional cost)
Why We Offer Hosting Accounts and VPS with Varying Limits
As you’ve probably got the picture by now, the more resources we provide you with, the more it costs us.
By offering different hosting packages with different resource sets, you can choose to use a hosting account that provides enough resources to operate your site, that is priced accordingly in a cost effective manner. You don’t waste money by obtaining resources that your site won’t make full use of.
The more popular your site becomes, and the more features you deploy on your site, the more resources you’ll need. The majority of upgrades that we offer are automatic and provided in place, so in most cases, it’s just a case of placing an upgrade order, making payment and the upgrade is automatically carried out.
In the event of a migration being required (such as moving from shared hosting to a VPS) we’ll carry out the migration for you.
This upgrade process becomes more applicable if you’re making websites for your customers, as the more websites you deploy the more resources you’ll need.
We’ve hosted a some of our customers for long periods of time, and helped them upgrade through the tiers of shared web hosting to VPS, and then in place VPS upgrades have been carried out. One of our customers started out with a single Unlimited hosting account, and is now operating their own bespoke VPS hosting over 100 websites. This customer makes around £27,000 profit on hosting fees alone. It just goes to show what you can do with a sensible upgrade path, and a bit of motivation!

